Repairing Dry Rot
Sorry for the low quality pictures - they were taken with a cheap camera, developed, and scanned with a second hand scanner. But, I think they show the process involved.
I'm saving up for a digital camera!  |
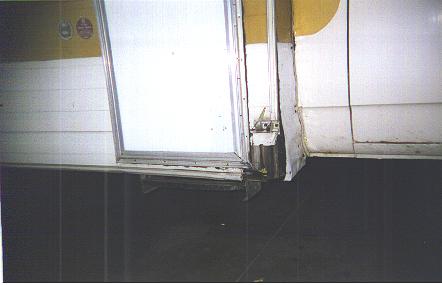
| This is a view of the damaged corner by
the entry door. Note that the damage does not appear to be too extensive -
basically just one foot or so of the lower corner of the underlying wooden
framework.
|
|
| This next shot is with the skin removed.
Notice that the dry rot extends well above the area that shows damage
in the first photo. Also the floor is rotted out and will no longer
support the step.
|

|
| This shows the repair that was made to
the lower wall and the step area. The sound wood was re-enforced by two by
fours and two by twos. This overkill was neccessary because the original
construction utilized plywood panels that extended above the repair area
and could not be replaced. The rotted portions were removed and replaced
with new wood.
|

|
|
The finished product!
This lower corner is now solid and the step area no longer sags when
you step on it.
|

|
